GMOインターネット株式会社の「ConoHa」では API が公開されており、アイデア次第では多くのことができそうです。
今回は、API ドキュメントページを見て、VNC コンソールとシリアルコンソールの違いと、それらのコンソールの URL を API を用いて自動で取得する方法について調べてみました。
確認に利用した C# のソースコードは最後に記載しています。
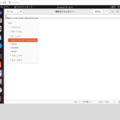
ConoHa 標準のコンソール
![[H27.07.14] ConoHa 通常のコンソール](https://blog.oyasu.info/wp-content/uploads/98bcd2d602b98070e58384c9894f6706.png)
ConoHa のコントロールパネルから表示できるため、コンソールといえば、これという方も多いでしょう。
特殊キーの送信や、複数行のテキスト送信も可能です。
弱点は、URLは一定ですが、ブラウザを閉じた後の再接続時にログインが求められることです。
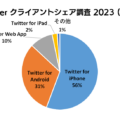
VNC(noVNC) コンソール
![[H27.07.14] ConoHa noVNC コンソール](https://blog.oyasu.info/wp-content/uploads/60fb70c6d2adf57a29aa5e05b63520d5.png)
上記のページを参考に、noVNC コンソールを開いてみました。
API を用いて URL を取得すれば、その URL を開くときに ConoHa のログインは必要ありません。
URL の形式は下記のとおりです。
https://vnc.tyo1.conoha.io/vnc_auto.html?token=(略)
ConoHa 標準のコンソールと異なり、特殊キーの送信や、複数行のテキスト送信はできません。
ちなみに、ConoHa 標準のコンソールと同時に開いていると、一方の変更がもう一方にも反映されます。
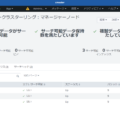
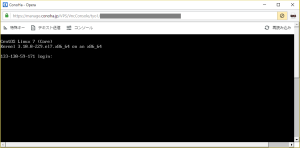
WebSocket(httpconsole) シリアルコンソール
![[H27.07.14] ConoHa WebSocket コンソール](https://blog.oyasu.info/wp-content/uploads/db2974afde3bbd005b4e4eab1432f65e.png)
上記のページを参考に、WebSocket コンソールを開いてみました。
API を用いて URL を取得すれば、その URL を開くときに ConoHa のログインは必要ありません。
URL の形式は下記のとおりです。
https://console.tyo1.conoha.io/bt/?token=(略)
一風違った画面が表示されました。「butterfly v 2.0.0g」というバージョンのようですが、調べてもよくわかりませんでした。
文字の表示が少しぼやけて見えますが、これもデザインの一つでしょうか。
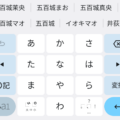
しばらく放置していると、CLOSED と表示されました。このデザインもおしゃれでした。
![[H27.07.14] ConoHa WebSocket コンソール Closed](https://blog.oyasu.info/wp-content/uploads/dd088dcfac9eea37864bc0b3ceca958b.png)
まとめ
ConoHa には複数のコンソールがあり、必要に応じて使い分けることができます。
- ConoHa 標準のコンソール
高機能・ブラウザでログインが必要 - VNC(noVNC) コンソール
機能は少ないが、APIを用いて自動的にログイン可能 - WebSocket(httpconsole) シリアルコンソール
ちょっと変わった画面、APIを用いて自動的にログイン可能
現在友達の紹介キャンペーンを実施しており、こちらのリンクから ConoHa に登録していただくと、1000円分のクーポンがもらえますので是非登録し、試してみてください。
C# ソースコード
using System;
using System.Text;
using System.Net;
using System.IO;
using System.Text.RegularExpressions;

namespace ConsoleApplication1
{
    class Program
    {
        static string apiUser = "APIユーザー名";
        static string apiPassword = "APIパスワード";
        static string tenantId = "テナントID";
        static string uuid = "VPS設定-UUID";

        static string identityService = "https://identity.tyo1.conoha.io/v2.0";
        static string computeService = "https://compute.tyo1.conoha.io/v2";

        static void Main(string[] args)
        {
            // トークンの取得
            string token = getTokens();
            Console.WriteLine(token);
            string b = getHttpConsole(token, uuid);
            Console.WriteLine("シリアルコンソール");
            Console.WriteLine(b);
            string c = getVncConsole(token, uuid);
            Console.WriteLine("VNCコンソール");
            Console.WriteLine(c);

            Console.ReadLine();
        }

        static string getHttpConsole(string token, string serverid)
        {
            string url = computeService + "/" + tenantId + "/servers/" + serverid + "/action";
            string datastr = "{\"os-getWebConsole\": {\"type\": \"serial\"}}";
            string result = postApi(url, datastr, token);
            return result;
        }

        static string getVncConsole(string token, string serverid)
        {
            string url = computeService + "/" + tenantId + "/servers/" + serverid + "/action";
            string datastr = "{\"os-getVNCConsole\": {\"type\": \"novnc\"}}";
            string result = postApi(url, datastr, token);
            return result;
        }

        static string getTokens()
        {
            string result = null;
            string url = identityService + "/tokens";
            string datastr = "{\"auth\": {\"passwordCredentials\": {\"username\": \"" + apiUser + "\", \"password\": \"" + apiPassword + "\"},\"tenantId\":\"" + tenantId + "\"}}";
            string resstr = postApi(url, datastr);
            // レスポンスからトークンの抽出
            Regex re = new Regex("\"id\":\".*?\"");
            var mc = re.Match(resstr);
            result = mc.Value;
            result = result.Replace("\"", "").Replace("id:", "");

            //
            return result;
        }

        static string postApi(string url, string datastr, string token = null)
        {
            string result;
            var req = (HttpWebRequest)WebRequest.Create(url);
            req.Method = "POST";
            req.ContentType = "application/json";
            req.Accept = "application/json";
            if (token != null)
                req.Headers.Add("X-Auth-Token", token);

            byte[] data = Encoding.ASCII.GetBytes(datastr);
            req.ContentLength = data.Length;
            // リクエスト
            Stream reqStream = req.GetRequestStream();
            reqStream.Write(data, 0, data.Length);
            reqStream.Close();
            // レスポンスの取得と読み込み
            WebResponse res = req.GetResponse();
            Stream resStream = res.GetResponseStream();
            StreamReader sr = new StreamReader(resStream, Encoding.ASCII);
            result = sr.ReadToEnd();
            sr.Close();
            resStream.Close();
            return result;
        }

        static string getApi(string url, string token)
        {
            string result;
            var req = (HttpWebRequest)WebRequest.Create(url);

            req.Method = "GET";
            req.ContentType = "application/json";
            req.Accept = "application/json";
            req.Headers.Add("X-Auth-Token", token);

            // レスポンスの取得と読み込み
            WebResponse res = req.GetResponse();
            Stream resStream = res.GetResponseStream();
            StreamReader sr = new StreamReader(resStream, Encoding.ASCII);
            result = sr.ReadToEnd();
            sr.Close();
            resStream.Close();
            return result;
        }
    }
}
csc.exe を用いることで、Visual Studio 不要でコンパイルできます。